I have a granddaughter with extreme autism. She wouldn't keep her clothes on. Her parents tried everything. Her mother made her an outfit sewing a t-shirt to stretch pants. It zipped up the back and they pinned it with a safety pin so she couldn't take it off. It worked for a while, but soon she learned to pull on the neck and pop the safety pin off and pull the zipper open. One day I was tending her and had to redress her 4 times in one hour. It was a difficult situation and we didn't know what to do. I thought, surely there are other families with the same problem. I searched the Internet and found nothing. Surely there were clothes to buy. Still nothing.
My son said, "Mom, we want you to figure out some way to make clothes she can't get out of." I couldn't think of anything, and dismissed it from my mind. One night just before I fell asleep, the thought came to me, "Put the zipper in upside down." I know it was an inspiration and an answer to prayers. I thought about it a while and here is what I came up with.
You need stretch pants, a Tall size t-shirt, and a long zipper. You need a Tall t-shirt so you have the length to pull the shirt over the head. I use a 30 inch zipper. It just needs to be long enough to go the whole length of the t-shirt.
I covered the end of the zipper with fabric from an old t-shirt. The zipper is a little scratchy and children with autism often have tactile issues so their clothes need to be soft and comfortable.
Turn the t-shirt wrong side out and pin the zipper in upside down.
Stitch along both sides of the zipper. I use a long stitch for this part.
It should look like this.
This is the stitching from the outside of the shirt.
I marked the middle of the zipper space. It was to show me where to cut the fabric. I don't do this anymore, I just eyeball it and cut down the middle the best I can.
This just shows the cut I made.
I don't cut all the way down.
Next, turn the fabric under and pin.
Stitch down the edge of the fabric. Use a regular size stitch length here.
Then do the other side.
This is how it should look.
Click on the photos if you need a bigger picture.
Now you are going to pin the top to the bottom. The best way to do this is to mark the shirt and pants with pins dividing them both into four sections. Then match those pins and then pin the rest of the way working in the shirt and stretching the pants to fit the shirt width. I usually have to put a few tucks in the shirt because it is so much larger than the pants.
I use a wide zig zag to stitch them together. I know the stitching doesn't look very good, but once they are wearing the shirt it doesn't show. It is hard to do this part and make it look really nice. Matching thread will hide your mistakes here.
The finished seam.
One of the first shirts we made had a v-neck. That didn't work because she could put her arms up through it and get out of the clothes. Even with regular t-shirts she could stretch the neck out and get them off. My son thought of a way to keep the neck from stretching.
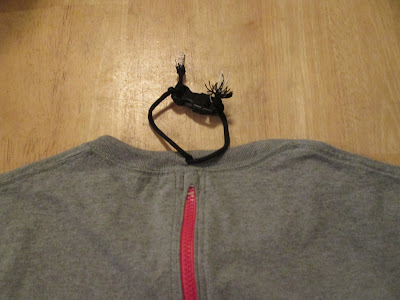
Cut a small hole in the neck piece of the shirt. Thread paracord through it. Put some clips on the cord. You clip these together and she can only stretch the neck as wide as the paracord.
Back.
When you put this on, you put the legs on first. You pull the waist up high so there is enough shirt to get it over her head. Arms next. Then zip it and clip it.
She has been wearing these for about a year now and they work perfectly. They keep her dressed.
The shirt has a blouson style to it. They actually look pretty cute.
I hope this tutorial helps other parents make clothes for their children.
I hope this tutorial helps other parents make clothes for their children.


No comments:
Post a Comment